 InspectDay
Blog
How to write a home inspection report
A finding the client can act on says what is wrong, where it is, how serious it is, and what to do next. Record each part on the item in InspectDay.
By InspectDay 3 min read
Create your InspectDay account.
In InspectDay, the finding’s description says what is wrong, its location says where it is, its finding type shows how serious it is, and its photos and video show it. The item’s recommended action says what to do.
Set the item’s condition
Tap the inspection on the Dashboard, then Start Inspection, or Continue Inspection if it is in progress. Open a section, then an area, then an item. Under Condition, choose Good, Needs Attention, Deficient or Unable to inspect. Until a condition is set, Details reads Complete condition first. Each screen’s steps are in the Inspection help.
Say what is wrong and where
Under Findings, tap Add findings manually. Enter the Description, choose a Finding Type and a Location, then tap Add Finding. The sheet has no photo or video field. Add those to the finding afterwards.
Say what is wrong in words the client will read, and name the part of the item it is on. The finding type is one of five, shown in the published report as Positive, Concern, Defect, Major Defect or Material Defect. A location is a named position, not a pin on the photo.
Show it with photos and video
On the finding, tap Add Media, then Take Photo or Record Video. A photo or video taken for a finding uploads without opening Annotate Photo. A video over 100 MB is refused, whether recorded or chosen.
Photos and videos of the item itself go in the Photos & videos sheet, which also offers Choose from device, for up to ten at a time. A photo taken there opens Annotate Photo, which you finish with Done.
Say what the client should do
Under Recommended Actions, tap Add actions manually. Enter the Description, choose an action type, select Mark as High Priority where it applies, and tap Add Action. The action types are Maintain, Replace, Clean, Consult Specialist and Other, as the published report labels them.
Publish and share the report
On the inspection’s screen, tap Publish. It reads Publish Progress while items remain, and Publish once every item is complete. In Publish Report, check the Report Title and tap Publish. The phone refuses to publish while changes to the inspection are waiting, sending or failed, and its screen shows how many.
Once published, the report is finalized and can be shared by email or link. It lists each item’s findings with their type, location, description and photos, and each item’s recommended actions with their type or, when set, a High Priority tag, description and photos.
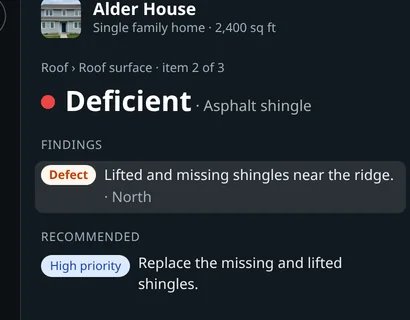
After publishing, tap View & Share Report. Share by link or by email, one method at a time. Anyone with the link can view the report. Email goes to up to ten recipients and needs an internet connection.
What InspectDay does not do
- The web app adds and deletes findings but does not edit one in place. Edit a finding on the phone.
- Deleting a finding removes it at once, with no confirmation.
- The phone app has no PDF. The web’s Download PDF keeps the report’s text, so it can be selected.
- The report shows no capture time for photos.
- A report covers one inspection and one date. Findings and photos do not carry over from an earlier inspection.
Start your next inspection report with InspectDay.
Create your InspectDay account.